Authentication
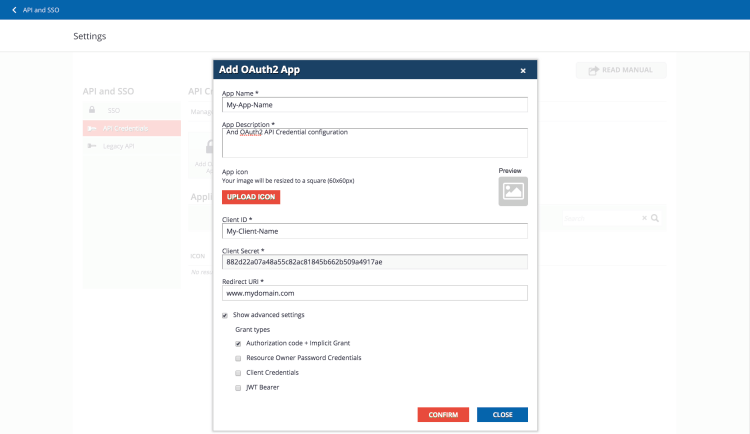
Docebo APIs use the OAuth 2.0 framework in most third-party scenarios, including authentication and authorization for web servers, installed and client-side applications. OAuth 2.0 app credentials can be obtained on the Docebo API and SSO App settings page.
Your client application will request an access token from the LMS, extract a token from the response and send it to each REST API that you’d like to access.
Activating & Setting Up the Docebo API & SSO App
You’ll first need to activate and set up the API & SSO app in your Docebo platform. Follow the steps outlined in this Knowledge Base article to properly configure the app and obtain your OAuth 2.0 credentials.
Obtaining an Access Token
Before your application can access private LMS data with a Docebo API, it must obtain an access token that grants access to that REST resource. A single access token can access multiple APIs. The “scope” parameter controls the set of resources and operations that an access token permits.
To obtain an access token, you will need to make a call to this endpoint as a Superadmin (please note that this endpoint only works properly if you are a Superadmin):
https://<yoursubdomain.docebosaas.com>/oauth2/token
For information related to the Oauth2 token and the parameters to include in the below requests, refer to Oauth2 official documentation.
Using the Resource Owner Password Credentials Grant Type
Here is a sample call with the grant type set to Resource Owner Password Credentials:
curl -X POST
https://<yoursubdomain.docebosaas.com>/oauth2/token
-F client_id=<your_client_id>
-F client_secret=<your_client_secret>
-F grant_type=password
-F scope=api
-F username=<your_username>
-F password=<your_password>Response:
{
“access_token”: “87b567fa3de847fb3adef9492b294bb83f8cd266”,
“expires_in”: 3600,
“token_type”: “Bearer”,
“scope”: “api”,
“refresh_token”:”7db6e6a331223fa0473cfcdf62eb8fec26407a5b”
}
Using the Client Credentials Grant Type
Here is a sample call with the grant type set to Client Credentials:
curl -X POST
https://<yoursubdomain.docebosaas.com>/oauth2/token
-F client_id=My-Client-Name
-F client_secret=ed8c18b099c1f9b8714aaef87001fa3de3a7183d
-F grant_type=client_credentials
-F scope=apiResponse:
{
“access_token”: “87b567fa3de847fb3adef9492b294bb83f8cd266”,
“expires_in”: 3600,
“token_type”: “Bearer”,
“scope”: “api”
}Please Note: With the new 7.0 APIs (found at YOURLMS.docebosaas.com/api-browser/), the system requires a specific user permission in order to work properly. Because of this, you will not be able to use client credentials to call this type of API.
Using the Authorization Code + Implicit Grant Grant Type
If your application uses the Authorization Code grant, then you should use the following URL to start the authorization flow:
https://<yoursubdomain.docebosaas.com>/oauth2/authorize
Using the JWT Bearer Grant Type
JSON Web Tokens are an open, industry-standard RFC 7519 method for representing claims securely between two parties. You can use JWT technology to get an access token to access Docebo APIs.
You can generate a JWT token with the method you prefer. Some samples, as well as libraries for many programming languages, are available on the jwt.io site.
To create a JSON WEB Token that can be used to authenticate within Docebo, you must set the signature algorithm to RS256 and upload your Public Key to the API and SSO app in your platform after selecting the JTW Bearer grant type. Here is an example of a public key:
—–BEGIN PUBLIC KEY—–
MIGeMA0GCSqGSIb3DQEBAQUAA4GMADCBiAKBgGOrtjv/oPcaWIQL7h3DwvGbWFhH
fAIP02pPPw1Cp8h0SUkmGAWUGKCNH2WuIeNxPlRZKmW86aivknrRtEN3QW6eEsFZ
ZSIKVmUPekKrSpvYmYwkTCnwCb4gpDu1ZPEde8VXhQjLRl7ielUktzzbXW7v1HmI
fDASHvMvIl4kwGA/AgMBAAE=—–END PUBLIC KEY—–
To allow the LMS to authenticate the user, the following information is necessary:
- iss: (Issuer) Claim. This should contain the Client ID configured inside the LMS for SSO.
- sub: (Subject) Claim. This should contain the username you want to use to log into the LMS.
- aud: (Audience) Claim. This should contain the LMS hostname (without protocol) in which you want to authenticate.
- iat: (Issued At) Claim. This should contain the token creation date in Unix timestamp format.
- exp: (Expiration Time) Claim. This should contain the expiry date in Unix timestamp format.
The token payload, therefore, will look like this:
{
“alg”: “RS256”,
“typ”: “JWT”
}
{
“iss”: “<your_client_id>”,
“sub”: “<docebo_username>”,
“aud”: “<yoursubdomain.docebosaas.com>”,
“iat”: “1510649850”,
“exp”: “2554329600”
}
Once you sign the token with your private key, you’ll get an encoded JWT token ready to be sent for authentication. An encoded JWT token is similar to this one:
eyJhbGciOiJSUzI1NiIsInR5cCI6IkpXVCJ9.eyJpc3MiOiJjbGllbnRfaWRfaGVyZSIsInN1YiI6InVzZXJuYW1lX2hlcmUiLCJhdWQiOiJ5b3VybG1zLmRvY2Vib3NhYXMuY29tIiwiaWF0IjoiMTUxMDY0OTg1MCIsImV4cCI6IjI1NTQzMjk2MDAifQ.mrA_k6OClsczj9kEz_jeGZxlusCmzOJWLyDGEp5A3BttCBna9aKP2_AqCaiwhntjrQ9L6NBEH9oxHr4pM2G9tyeSEGxD0VLVe3CoDljzMgvMdyyK8HP40QtALCYEuVF2BIpS8Mz2KhvysKhzVJR71suwaAYnR0I7G8_kAlUR9Ck
You can then send the data to the authentication endpoint. Here’s a sample call with the grant type set to JWT Bearer:
curl -X POST
https://<yoursubdomain.docebosaas.com>/oauth2/token
-F grant_type=urn:ietf:params:oauth:grant-type:jwt-bearer
-F scope=api
-F assertion=eyJhbGciOiJSUzI1NiIsInR5cCI6IkpXVCJ9.eyJpc3MiOiJEb2NlYm9PRU0iLCJzdWIiOiJyaWNjYXJkby5nYWxpbWJlcnRpQGRvY2Viby5jb20iLCJhdWQiOiJyZ2FsaW1iZXJ0aS5kb2NlYm9zYWFzLmNvbSIsImlhdCI6IjE1MTA2NDk4NTAiLCJleHAiOiIyNTU0MzI5NjAwIn0.n0Sr0Cy3wjE7C-TqJLTi1JfZjnWnXcKoCidCtz4o8HsaHI0LomM5Ln3gWOqJXq5EI67yDr9L_EwA44-_lFKVjV8FAmUU72ZU6indDXP7SaCMEmqQu5tbo9AnW_RKHGoAXPWspH95iZe_VaM0SFjmHboZXGgPmEt3aNfhaJBBzIcLuk1EIcGZEqtN4ENVp_MREtCMrFg3yMyx47dcf0rmBvizkmthTW1so8TG7OXgTfNR0tzPNAOPGbRqciSgfcBNb_ftalW0gE3unAnXpfqMD-8gcUq-c43DfTOiCeNm-ZBLmrVoKeUXshyDjf0JOrP8kReIQ9mWIyI0-gvh5-UMVQ{
“access_token”: “87b567fa3de672fb3adef9492b294bb83f8cd266”,
“expires_in”: 3600,
“token_type”: “Bearer”,
“scope”: “api”
}
Sending the Access Token to an API
After obtaining an access token, your application needs to provide the token to every Docebo API call in the HTTP Authorization header in the format:
Bearer <access_token>
curl -X GET
https://<yoursubdomain.docebosaas.com>/learn/v1/courses
-H ‘Authorization: Bearer 2af6ac532cfef197b00f69639aeeef86621d1975’
Refreshing the Access Token
Because tokens have a limited lifespan of 14 days, your application can obtain a fresh token using the Token Endpoint if it needs to access a Docebo API beyond the life of a single access token. A refresh token allows your application to obtain new access tokens.
Please make sure you follow the guidelines outlined in the OAuth2 official documentation with regards to using and safely storing a refresh token.
Sending the Access token For Single Sign-on
After obtaining an access token, your application needs to insert the token in a specific URL format to allow for SSO. Here is the format:
https://<YOURLMS>.docebosaas.com/learn;type=oauth2_response;access_token=<token>;expires_in=4000;token_type=bearer;scope=api
Please Note: If you are using a custom domain, you should replace “YOURLMS.docebosaas.com” with your custom domain URL.
