Introduction
In your platform, you can manage user levels, roles and user statuses in order to better regulate registration, access to certain features, responsibilities, and maintenance of your platform. Let’s take a look at both user levels, roles and statuses (both in the platform and within courses).
User Levels in Your Platform
There are three user levels available within your platform: Users, Power Users, and Superadmins. The user level is set for the first time when the user is created in the platform, but can be changed over time from the Users management area.
The majority of people who access your platform will likely be users. A user is a level that has basic permissions. Users are able to attend courses and learning plans, they can view training materials but cannot manage any platform app, feature and setting, nor the Admin Menu. When users log into the platform, they can access the functionalities they have permissions to see from the main menu associated with their user profile.
Superadmins are able to manage every aspect of the platform. They have visibility of all apps, features, and settings. There is no way to limit a Superadmin’s permissions within the system. They are able to access any area of the platform from the gear icon in the top right corner of the platform, which grants them access to the Admin Menu. You likely will have only one or a handful of Superadmins.
A third user level, Power User, is available when the Power User app is activated in the platform. Power Users are users who need to perform specific management operations or oversee specific user groups or courses in the platform, and, for this reason, they are given a specific subset of the Superadmin’s permissions. Power Users can access the Admin Menu from the gear icon, but their menu will be limited based on their specific set of granted permissions. The table below outlines which permissions are visible and configurable by each of the user levels.
User Roles in Your Platform
Users can assume one or more roles in the platform, independently from their user level. The roles in the platform are learner, instructor, manager and expert.
Learners represent the majority of your users since learners are the target audience of learning platforms. It is highly likely that all of the people you identify with the level users are learners, but Superadmins and Power Users can be learners too, since they may also be involved in the training program of your company. The learner role is assigned when a user is enrolled in a course. Refer to the Learner Guide for a comprehensive manual on how learners interact with the platform.
Instructors actually lead the courses in your platform, and can manage some course settings within the platform for E-Learning, webinar, and classroom courses. Instructors can upload training materials for courses, manage the content and the layout of courses in the platform, view the course’s enrollments and reports, evaluate users of classroom courses, mark their attendance and add recordings to webinar courses. Instructors cannot enroll users in courses. The instructor role is assigned when a user is enrolled in a course. Refer to the Instructor Guide for a comprehensive guide on what instructors can do in the platform.
Managers can monitor the activity of their team members directly by managing parts of their learning experience or contacting them to investigate certain situations. Depending on how the Superadmin configures the platform, managers may be able to build their own team. Managers can also enroll users in courses and learning plans. A user becomes a manager when a Superadmin or a Power User (with granted permissions) assign some team members to him/her.
Experts are platform users considered more experienced than others in a certain field or topic, which means that they can help other learners better contribute to your platform’s knowledge repository by peer-reviewing the content that they’re sharing, answering questions, and more. Experts may be assigned to one or more channels. Channel experts can review content uploaded by the learners and, through the peer-review process, publish or reject it. They can also answer questions from learners about the channel that they manage or about specific assets. Refer to the Expert Guide for more details on experts. The Expert role is only available when the Discover, Coach & Share module is active in your platform.
Users can also be enrolled as tutors within a course. Tutors have the exact same permissions as learners within a course, but they are also able to moderate forums if the forum widget is activated in the course.
Check out the comparison chart of each capability for these three course levels.
User Statuses on the Platform Level
User statuses determine which users have access to the platform and which users do not. Superadmins can manage the statuses of users by activating or deactivating them via the User Management section of the platform. There are four possible statuses for platform users:
- Active. These are users that are activated in the platform and have accessed at least one course or training material, or at least one informal learning asset from the Discover, Coach & Share module. They are marked with a green checkmark in their rows in the main users’ list.
- Activated. These are users that have access to the platform, but have not accessed any courses or training materials. They are marked with a green checkmark in their rows in the main users’ list.
- Deactivated. These are users that no longer have access to the platform. If they try to access the platform, they will receive an error message on the login page and will need to contact the Superadmin. Deactivated users are manually deactivated by the Superadmin, and the deactivation is done immediately, unless the Superadmin chooses to expire the user. They are marked with a grey checkmark in their rows in the main users’ list. Even if the user is deactivated, the user’s data is not erased by the platform.
- Expired. These are users that no longer have access to the platform because the Superadmin set a specific expiration date for their activated user status, and that date has been reached. If they try to access the platform, they will receive an error message on the login page, and will need to contact the Superadmin. Even if users are expired, their data is not erased in the platform. They are marked with a warning icon in their Status column, preventing the Superadmin (or a Power User with granted permissions) to change their status. You can set back the previous status (either Activated or Deactivated) of expired users only by editing their profiles and updating their Expiration Date to a future date. Please note that this operation does not automatically activate the user’s status, it is a reset to the previous state.
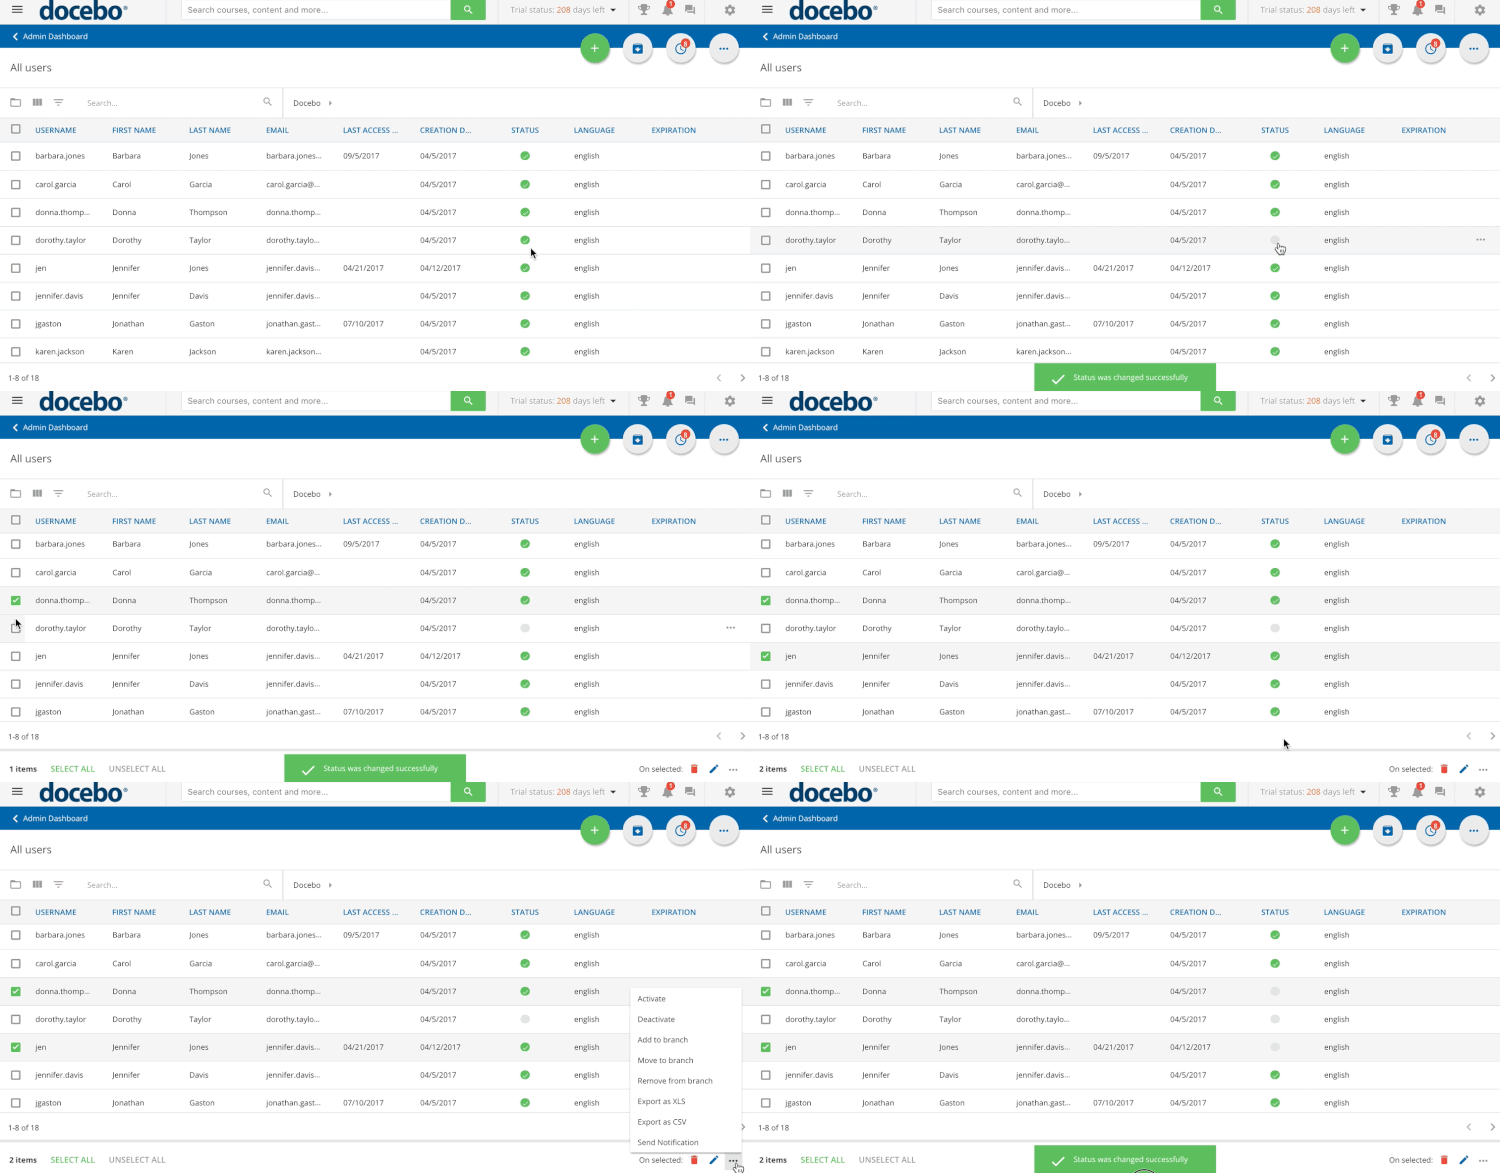
To view or change a user status in the platform, access the Admin Menu by scrolling your mouse over the gear icon in the header. Then, in the E-Learning section, press the Users item to redirect to the User Management page. On the main Users page, find a user in the list, then find the checkmark in the user’s row. If the checkmark is green, then the user is activated. If the checkmark is grey, then the user is deactivated. You can press the checkmark, switching it from green to grey, to deactivate a user, and vice-versa.
As the Superadmin, there are two ways to activate and deactivate multiple users at one time. The first way to do so is by flagging the checkboxes in the user rows for the users that you want to activate or deactivate, then selecting Activate or Deactivate from the ellipsis icon menu at the bottom of the page. You can also massively activate or deactivate users via CSV, refer to this manual to learn how to do so.
Please note that it is not possible to change the status of the user currently logged into the platform.
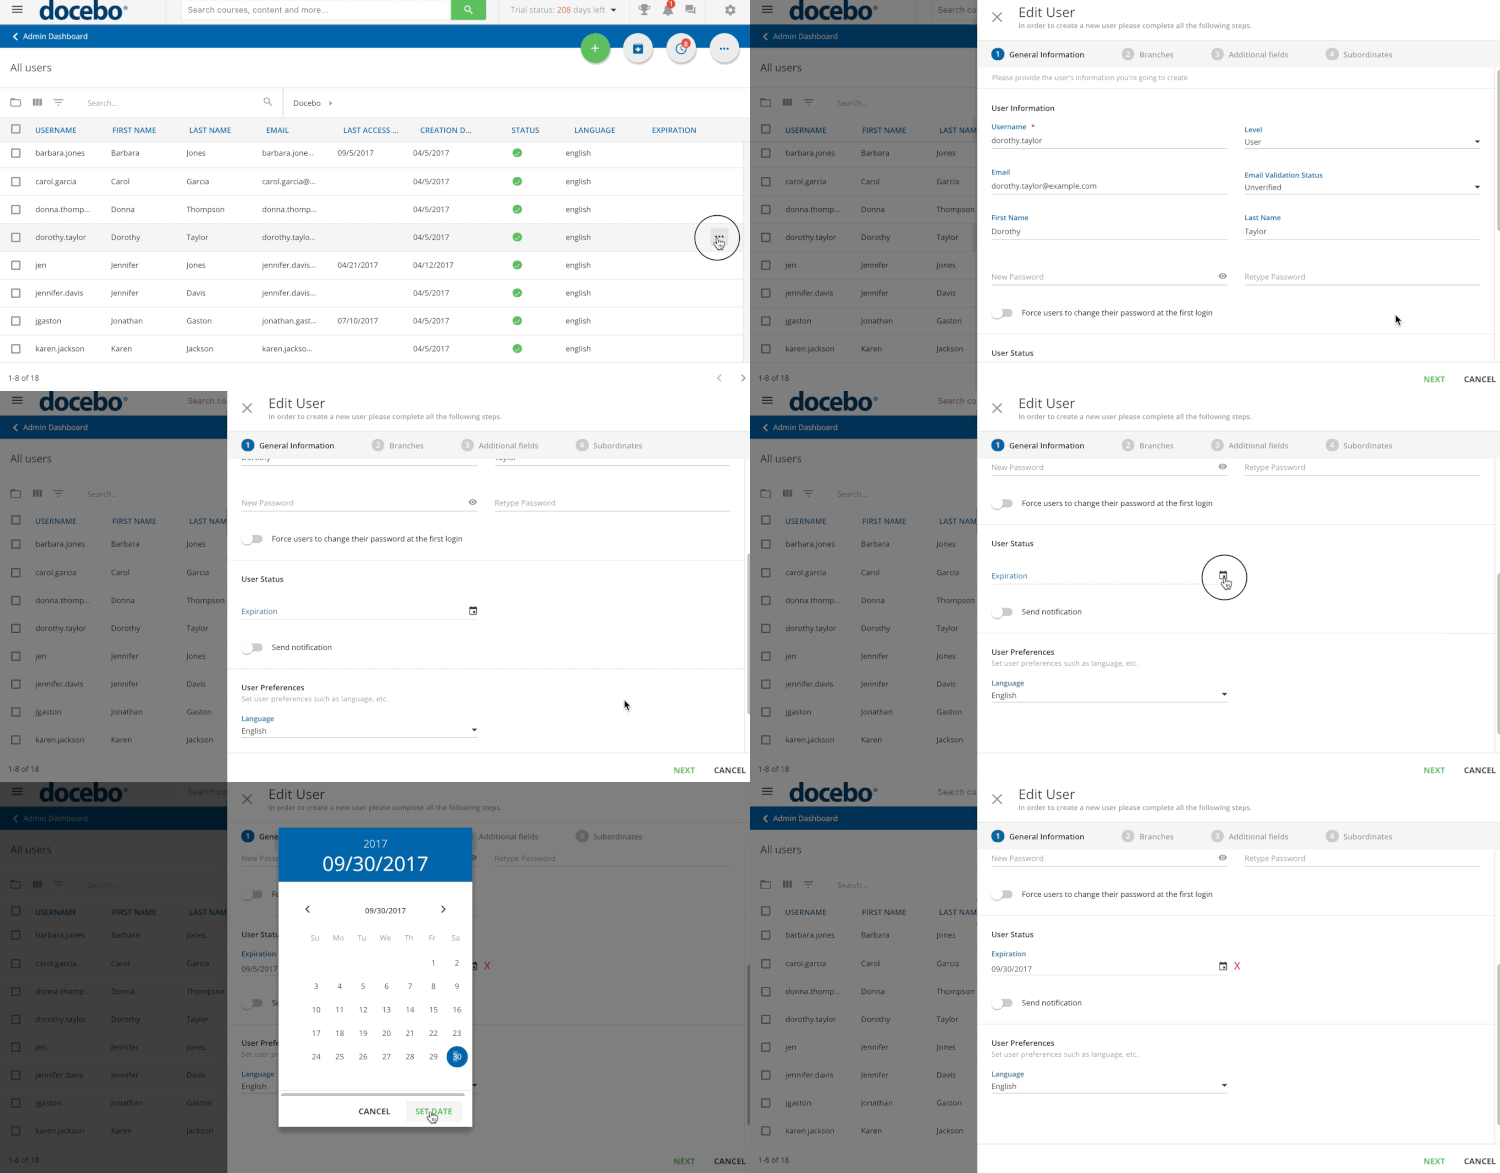
You can also set the expiration date of a user, so they will become a deactivate user after a certain date. To set the expiration date, press the menu icon in the user’s row in the user list, then select the Edit item from the dropdown menu. In the edit menu for the user, find the Expiration field, then click on the calendar icon to select the expiration date from the calendar. Press Confirm at the bottom of the menu when finished.
User Statuses at the Course Level
Superadmins can manually manage and change the statuses of users on a course’s Enrollments page in the platform. There are five possible course statuses for users:
– Not Yet Started. These users are enrolled in the course but have not yet started any training material within the course. For webinars or ILT courses, these users are enrolled in the course but have not yet attended the session(s) in which they are enrolled. Users can freely access the course from their My Courses and Learning Plans area.
– In Progress. These users are enrolled in the course and they have started viewing the training material in the course, but they have not completed the course. For webinar or ILT sessions, these users are enrolled in the course and they have started viewing the training material but not yet completed all training material, regardless of whether they have attended sessions or not. This status may appear for webinars or ILT courses if the user has attended only part of the total amount of sessions in which they have been enrolled.
– Completed. These users are enrolled in the course and they have already completed the course, or all sessions in which they are enrolled in a webinar or ILT course. Users can freely access the course from their My Courses and Learning Plans area.
– Waiting Users. These users have self-enrolled (or were enrolled by someone else) into the course, but they are waiting for Admin approval before being able to access the course. They need Admin approval either because of the enrollment policy of the course or the enrollment capacities. Refer to this article to learn more about enrollment policies for courses. While waiting for enrollment approval, these users do not have access to the course, but they will see a waiting list page when trying to access the course from the My Courses and Learning Plans area.
– Subscriptions to Confirm. These users are enrolled in a webinar or ILT course, but they are waiting on approval to be enrolled in a session of that course, either due to enrollment policies or session capacities. While waiting for enrollment approval into a session, these users have access to the course from the My Courses and Learning Plans area, and they can view the training material in the course. However, they will not be able to actively attend a session of the course. Note that this status appears for E-Learning courses as well, but it serves the same functionality as the Waiting Users status.
– Suspended. These users can access the platform, but they cannot access courses in which they have been suspended. A user is manually suspended in a course by the Superadmin or Power User managing the course. They will not have access to training material or any course page for the courses in which they’re suspended.
– Overbooking. These users are enrolled in the course, but they cannot access the course or training material in the course. As an Admin, you must manually assign this status to a user after they have been enrolled in a course.
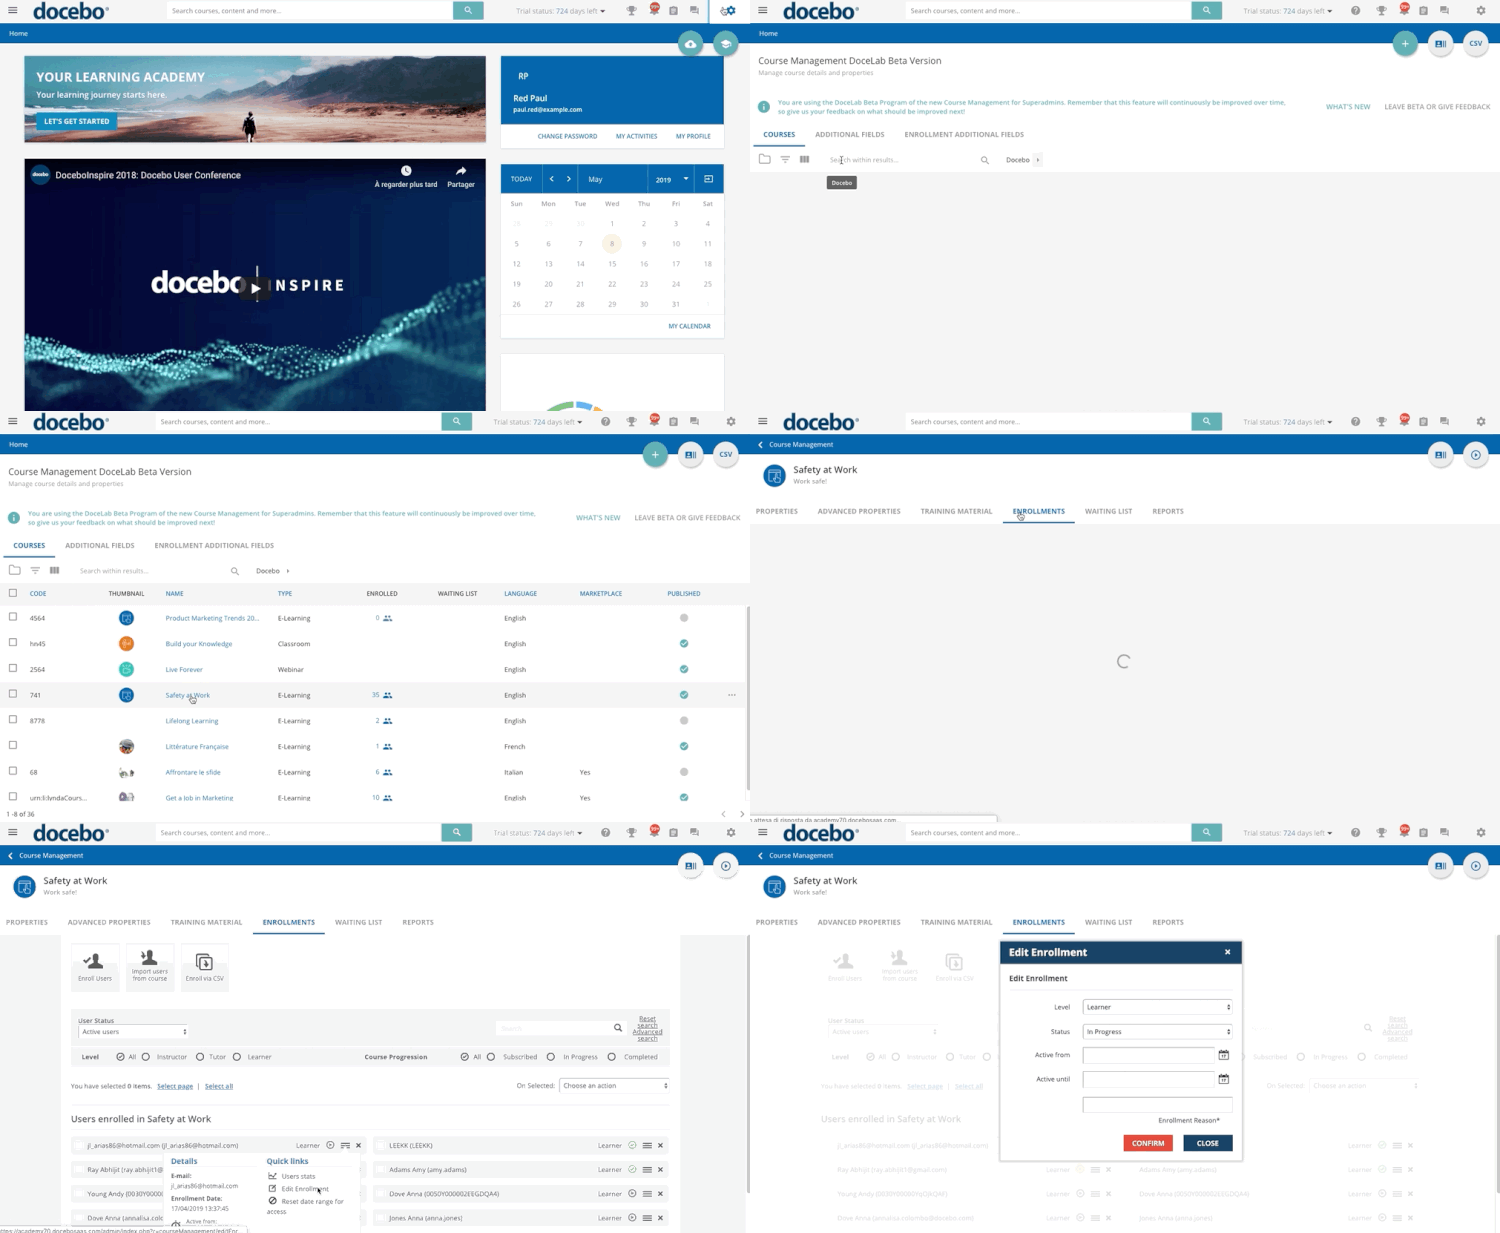
As the Superadmin (or a Power User with correct permissions in a course), you can always manually edit the user’s status in a course at any time. To do so, access the Admin Menu from the gear icon, then select the Courses subitem in the E-Learning section. Find the course in the list on the main Course Management page, then press the people icon in the course’s Enrolled column. As the Superadmin (or a Power User with correct permissions in a course), you can always manually edit the user’s status in a course at any time. To do so, access the Admin Menu from the gear icon, then select the Course Maintenance subitem in the E-Learning section. Find the course in the list on the main Course Management page, click on the course description and, once in the course area, move to the Enrollments tab.
Find the user on the course’s Enrollments page, then press the menu icon in the user’s item. Then, select Edit Enrollment. In the pop-up box, you can change the user’s level or status in the course. When finished, press Confirm. For more information on managing users in courses, refer to these articles.


