E-Learning Certificates are forms whose content can be customized in order to give a feedback about the tracked users’ performance while attending a course.
This guide is intended to show you how to: create a certificate; link the certificate to a course; make it available to the users.
You can create a standard template, that is suitable for all courses, or design a specific template for each course. In order to respect your corporate identity, be sure to choose a background properly related to your company’s logo, colors and slogan.
1 – Create new E-Learning certificates
Switch to the Advanced version in order to access the Admin Area and find the Certificates tool.

While inside the Admin Area, select “Certificates” under the “My LMS” top menu. Click “Add” and fill in the form with code (optional), name, language and description.

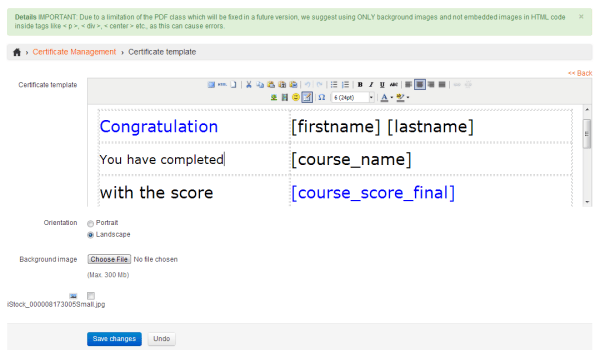
You are now able to customize your template. The default E-Learning certificate is a useful example if you don’t want to built it from scratches. Just remember that an effective template should have:
• A background image: max 300 Mb and A4 paper size. In order to avoid technical issues, don’t embed images in the HTML code.
• A text: the text box allows you to customize font, colors, text order but also insert links.

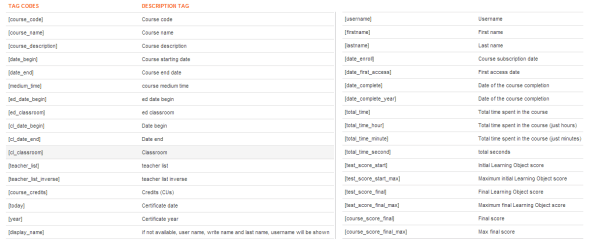
• HTML keys: these keys are linked to custom data extracted from the system. For example, when you use the key “Date of the course completion” the system will include this key into the certificate of each user who has completed the course. This is the list of the available keys:

When the certificate is ready, click “save changes”. The menu next to the new certificate allows you to edit the template, download a preview of the certificate, print it, change its settings or delete it at all.
2 – Link the E-Learning certificates to a course
The second step is about to link the E-Learning certificate to a course. In the main menu, select “My LMS – courses”. Then click the “Certificate Assignment” icon next to the course you’d like to certificate.
![]()
Choose one of the available certificates and decide if you want to use it for:
- Users with any kind of status
- Users who are attending the course
- Users who have completed the course
Then, click “save changes”. Now that you have assigned the certificate, the highlighted icon will become black.

3 – Make the certificate available to the users
In order to let users access the certificate, you have to enable it in the Admin Area. Click the “settings” icon and choose “My courses Layout”. Now click the flag icon next to the Certificates entry (the icon will become green). You can also decide which users, groups or organization charts will be able to see the certificates area: just click the first icon and edit your settings.
![]()
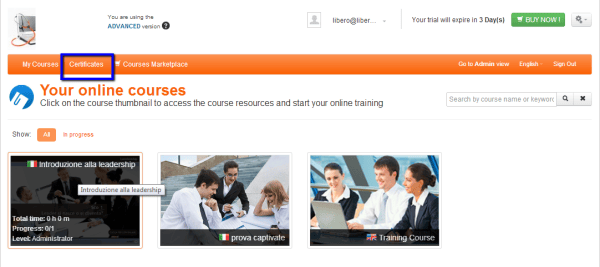
Now, the Certificates area is visible in the My courses area.

