Introduction
Docebo’s Dashboard functionality allows you to create customized dashboards for you users to see upon logging into their platforms, in turn allowing you to provide them information in a quick and simple way. Dashboards serve as a platform homepage. They generally include all of the information and modules that you want your users to access quickly. You can create as many dashboards as you want, assigning specific dashboards to each kind of user you manage in the platform.
For example, you can customize a dashboard based on your organizational chart nodes by building and assigning a different welcome page for each branch. You can also create dashboards based on the user’s level. For example, creating one dashboard for the Superadmin, one for the power users, and one for the learners. Each dashboard will display different information as per your needs. Please note that only Superadmins can create and customize dashboards.
DISCLAIMER: This functionality only works on those using Docebo’s 6.9 theme, which has a set End of Life date of July 31, 2019. The new Docebo Pages features lets you build custom pages and menus for various user groups in your platform, no coding skills required. You should start creating your pages & menus as soon as possible to avoid any disruptions in your platform for your users.
Creating a New Dashboard
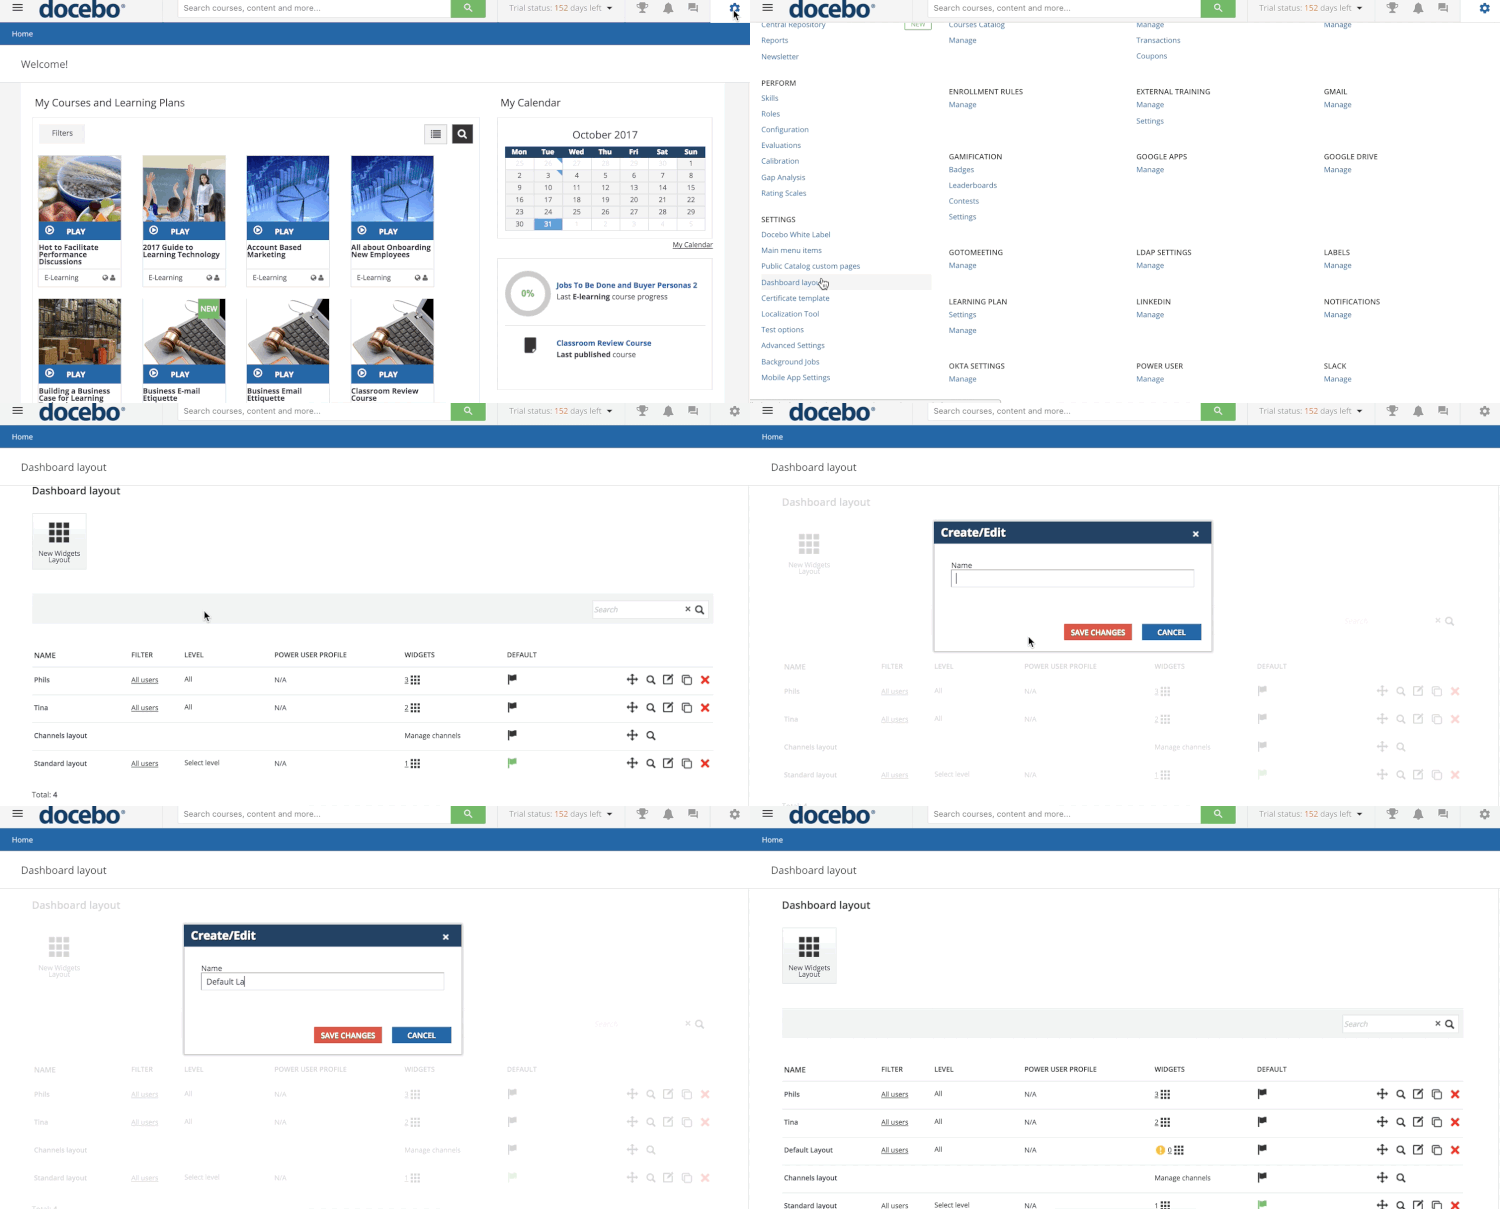
Log into the system as the Superadmin, then select the gear icon from the top right corner to access the Admin Menu, then press the Dashboard Layout subitem from the Settings section. The platform’s default dashboard configuration is called the Standard Layout, in which you will find only the My Courses area. You can apply this widget to all of the users that have no other dashboards assigned to them by simply pressing the black flag.
When the flag turns green, it means that all of the users will see this dashboard as their main page in the platform. You can edit the standard layout by adding new widgets or adding other dashboards. To create a new dashboard select the New Widgets Layout button in the action bar at the top of the page, then assign a name to the new dashboard and press Save Changes in the pop up box.
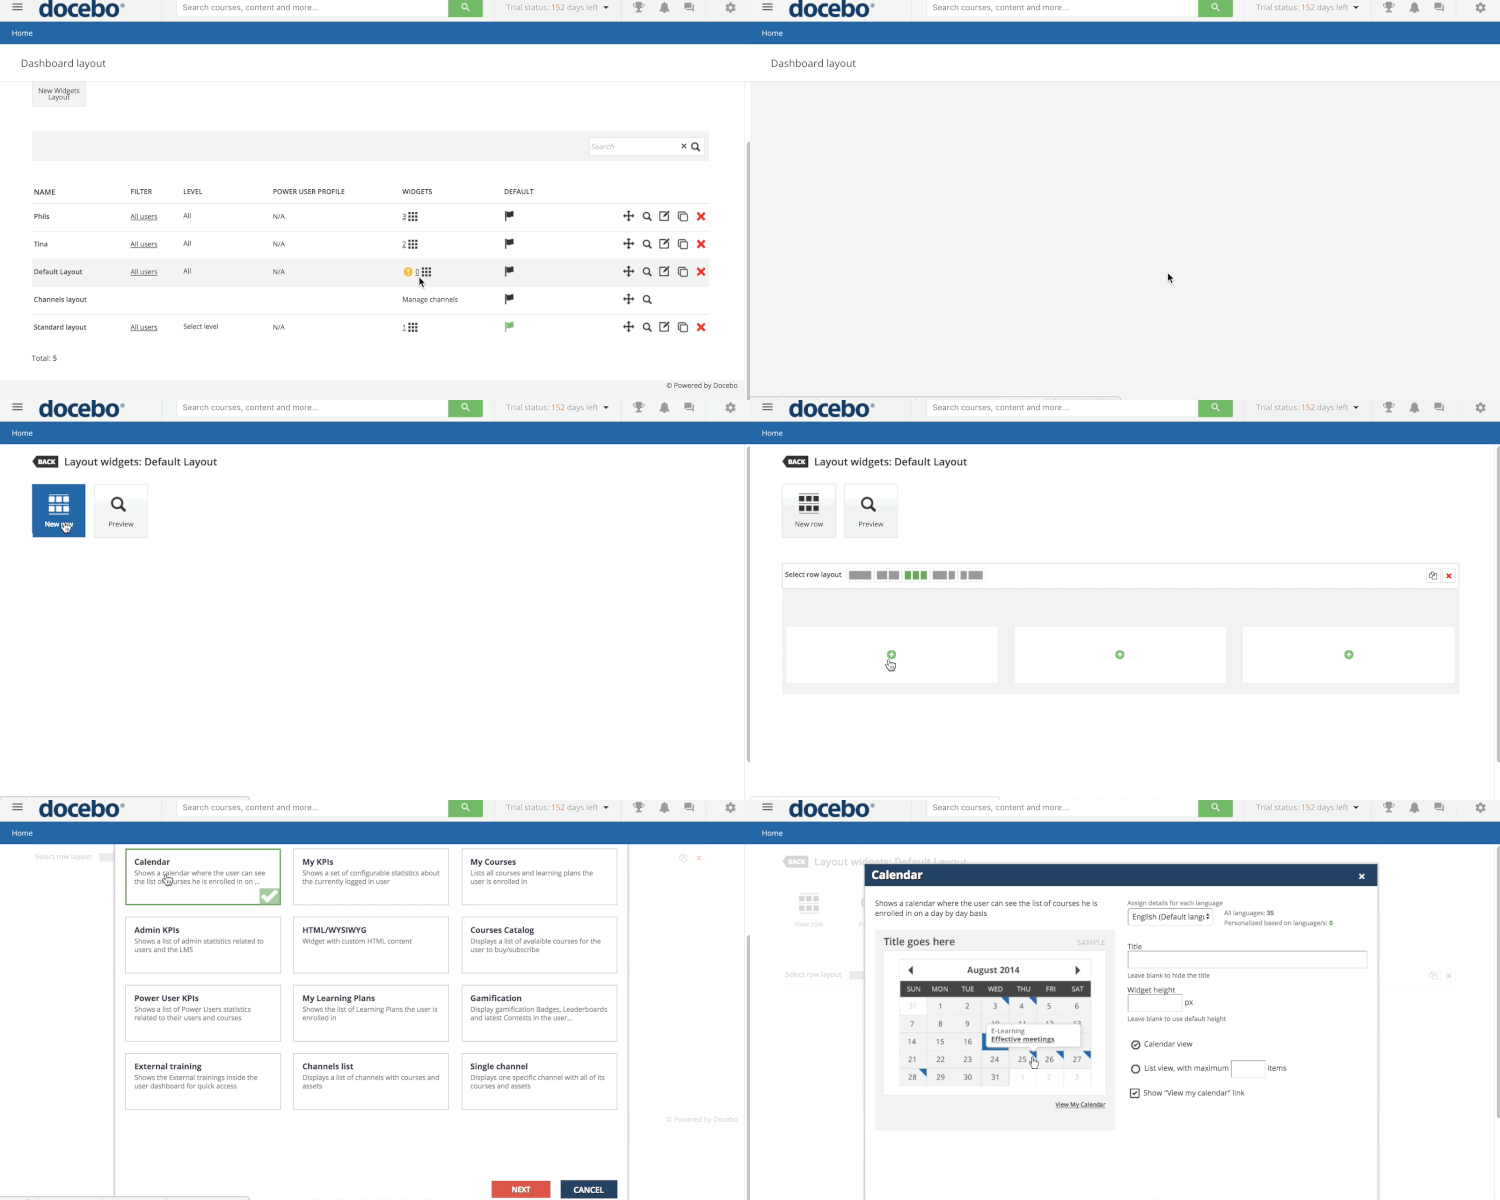
Now, find the dashboard in the list of dashboards. Press the widgets icon in the dashboard’s row to add the widgets to your dashboard. Begin by adding a row into this dashboard by pressing the New Row button in the action bar at the top of the page. Then, move to the Select Row Layout section for the new row, and pick how many columns and which layout you want for that specific row.
Now, press the plus icon inside the rectangle in order to choose which widget you would like to insert. Select the widget from the widgets menu then press Next. Now, you need to fill out the settings page for the widget. Please Note: The settings page will differ from widget to widget.
Once you have inserted all of the widgets and configured the settings for each widget, you can check the final outcome by clicking on the Preview button in the action bar at the top of the page, or you can add another row to the dashboard, thus adding more widgets. You can insert as many rows as you want. Once you are finished, you can assign the new dashboard to specific users.
Assigning Dashboards to Specific Users
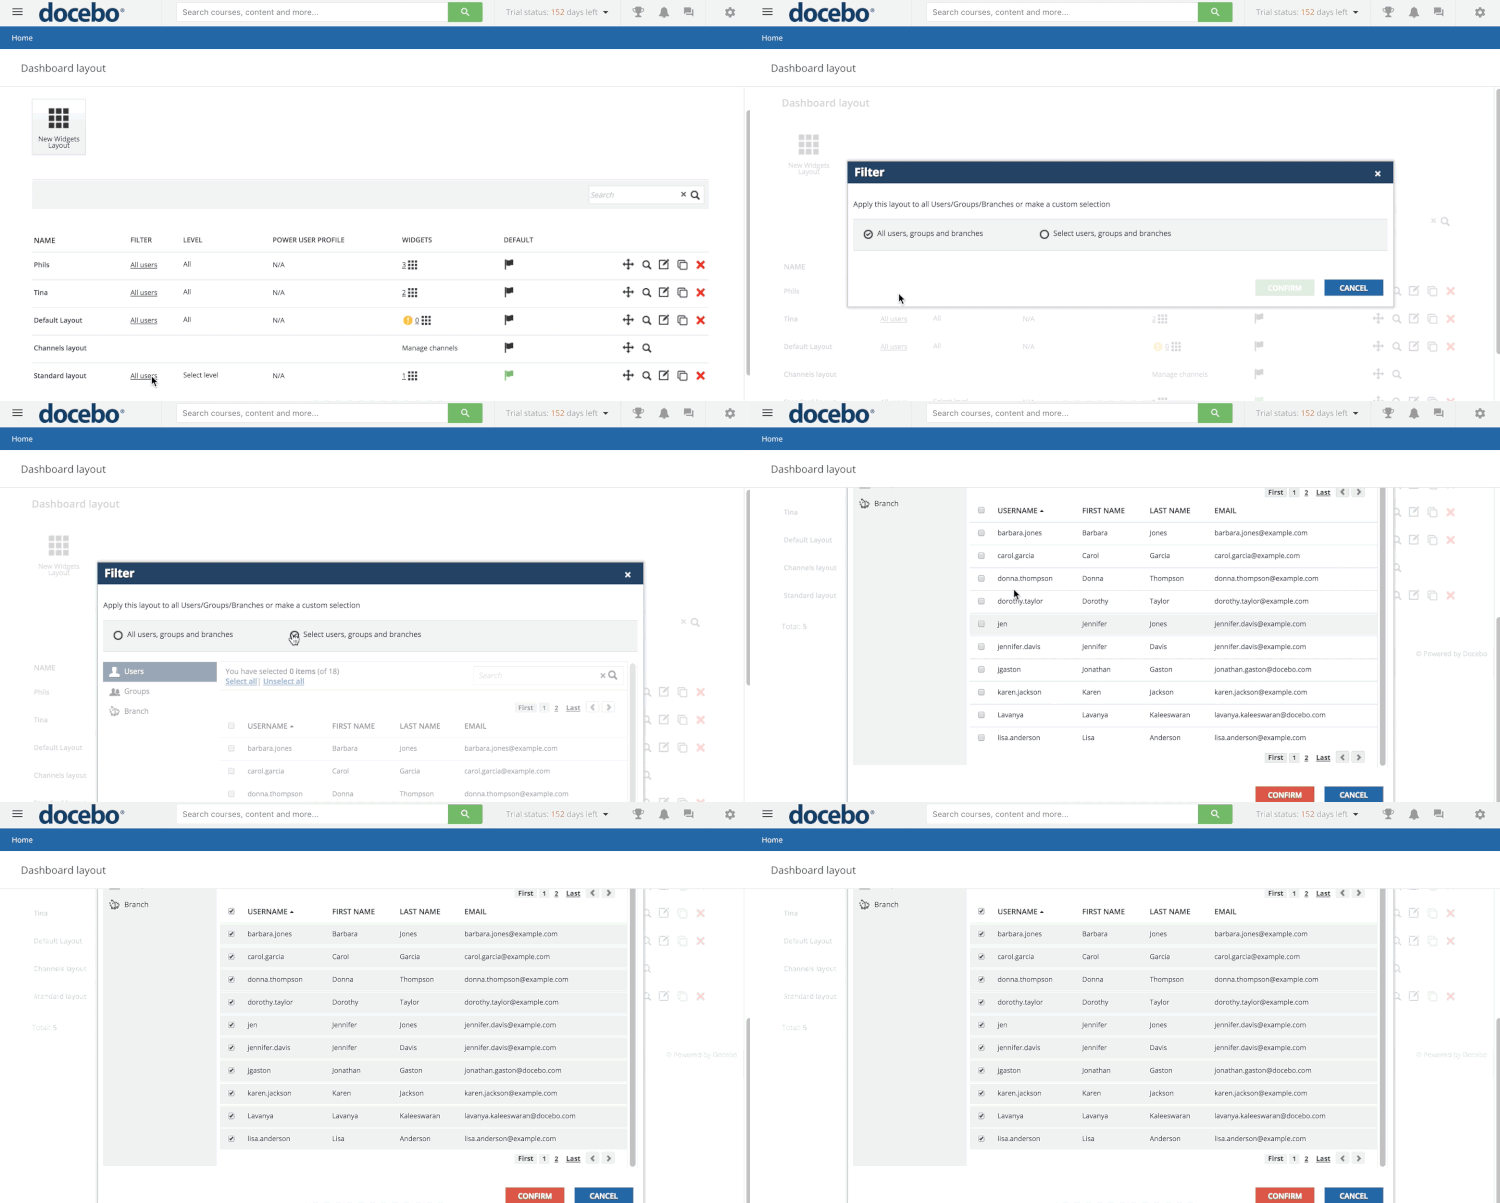
In order to assign a dashboard to a specific group or folder (or multiple groups or folders), select the Filter item in the dashboard’s row in the list of dashboards. Now you can choose the users who will see this dashboard as their main page in the platform. Remember, you can create a specific dashboard for a specific branch of your organizational chart, then assign the dashboard to that specific branch.
You can also create a specific dashboard for a particular target group by choosing from Users, Power users or Superadmins. For example, you can create a specific dashboard for a company manager, and another one for the power users of the company. Please remember that if you assign a dashboard to Power Users, then you must also choose the Power Users’ profile that will be able to see the items selected in the new dashboard. Select the Power User Profile link related to the dashboard, and choose if you want to apply the item to all Power Users or to just a specific Power User profile.
Once you’ve applied a specific dashboard to users, the following logic will apply for the next time that said users login to the platform: The LMS will check the first dashboard layout in the list of dashboard layouts to see if the user exists in the filter that is configured for that layout. If the user does not fit in that filter, the LMS will then check the next dashboard layout in the list and perfect the same query until it finds the correctly assigned layout for the user.
You can also choose to apply a standard dashboard to all other users whom you don’t want to associate with the new dashboard. To do this, click on the flag related to the dashboard that you want to delegate as the default main page for these users. Now, you can start adding widgets. There are several kinds of widgets that you can insert into a dashboard. Let’s take a look at all of them.
Iframe Widget
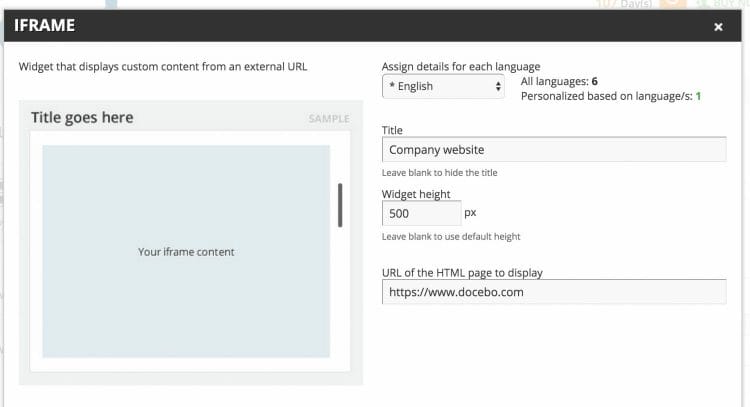
This widget displays content from an external URL. You can simply copy and paste the link of the website that you want to show in the widget. Insert the title of the widget, the height, and the link of the page that you want to display. To hide the title, leave the title text box empty. If you do not insert a value in the widget height text box, the system will use the default height for this kind of widget. When you’re finished, press Confirm to create the widget.
Social Widget
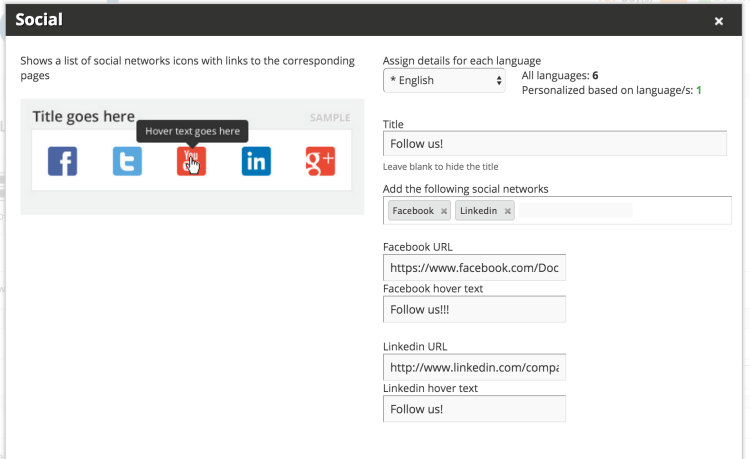
The Social widget allows you to quickly display links to social media pages. Docebo supports the following social networks: Facebook, Twitter, YouTube, LinkedIn, Google Plus, and Pinterest. Insert the title, then choose which social networks you want to display into the corresponding text boxes. Once you have inserted the names of the social networks, you will also be able to insert the links to the social media webpages, as well as the text that will appear when someone hovers over on the related icon in the widget. When you’re finished, press Confirm to create the widget.
User Profile Widget
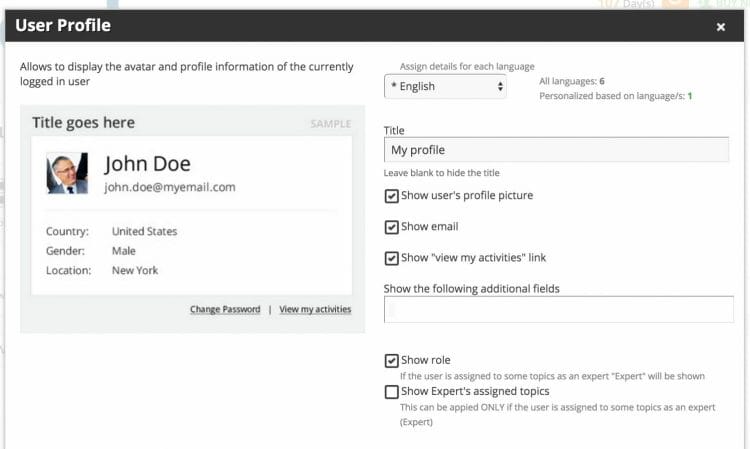
This widget allows you to display the avatar and profile information of a user that is currently logged into the platform. Begin by inserting the title of the widget, then choose what information you want to show in the box: the user’s profile picture, email address, and the My Activities link (if you select this option, users will be redirected to the user’s personal summary page). If you have previously created user additional fields, you can insert them into the widget by adding the names of the fields in the corresponding text box. When you’re finished, press Confirm to create the widget.
Calendar Widget
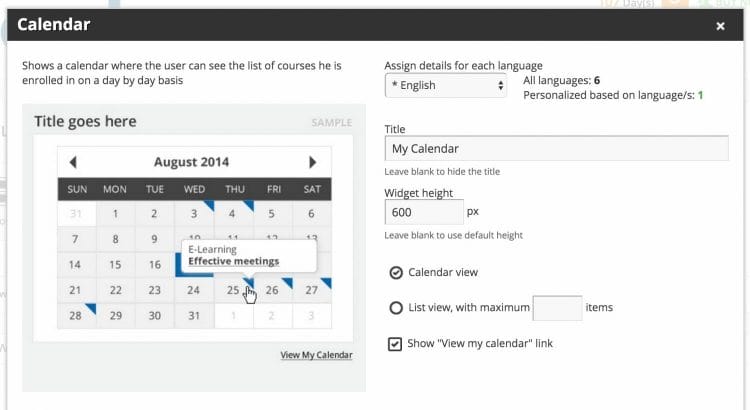
This widget displays a calendar showing all of the courses in which a user is enrolled on a day-to-day basis. Insert the title of the widget. Then, choose how to display the information: either as calendar view or as list view. If you select the list view option, you can also decide how many items you want to show in the list. Press Confirm to create the widget.
My KPIs Widget
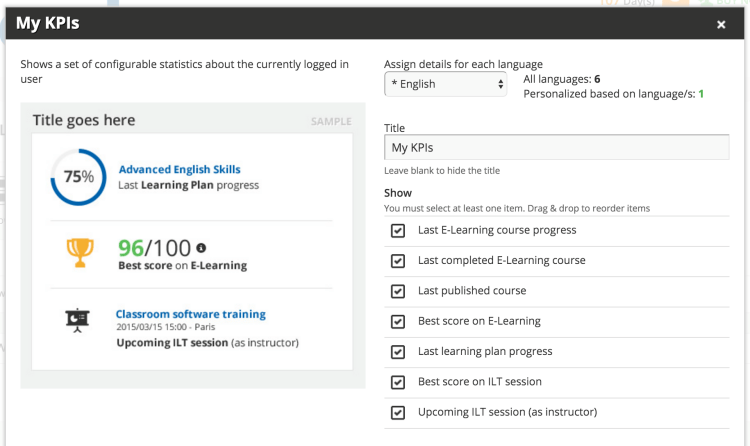
This widget displays a set of configurable statistics about a user that is currently logged into the platform. Insert the title of the widget, then select which items you want to include in the widget by flagging the check box next to the KPI listed. You can also change the order of the items by pressing the cross icon to drag and drop the elements. Press Confirm to create the widget.
My Courses Widget
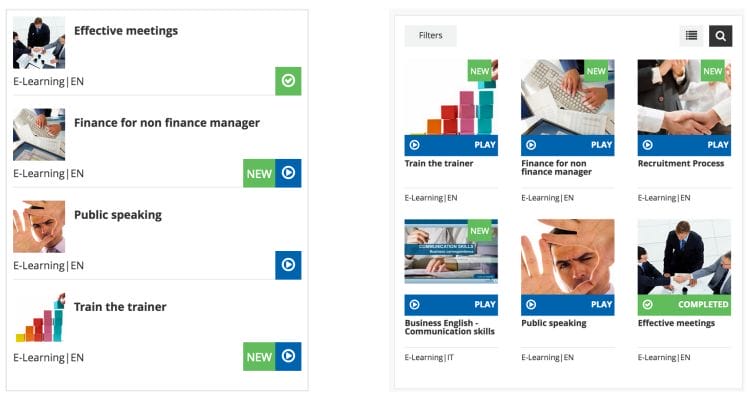
This widget lists all of the courses and learning plans in which the user is enrolled. Please note that if you do not insert the Courses widget in the users’ dashboard, they will not be able to see their courses upon logging into the platform. Insert the title of the widget, then choose if you want to show the courses as a list or as thumbnails. Please remember that thumbnail view is only available if you insert this widget in a one-column or two-column layout. Check the difference between the thumbnail view and the list view:
You can also choose if you want users to see the search bar and the switch button, which allows them to change the course view modality. Then, select how you want to sort the courses, either by course name, status, creation date, subscription date, or code. Next, define how many courses you want to show in the widget and in the full list. Users can access the full list by pressing the View All Courses item. You can also decide if you want to paginate the widget or show the View All Courses item. Finally, you can choose to not display courses that are included inside learning plans.
Admin KPIs Widget
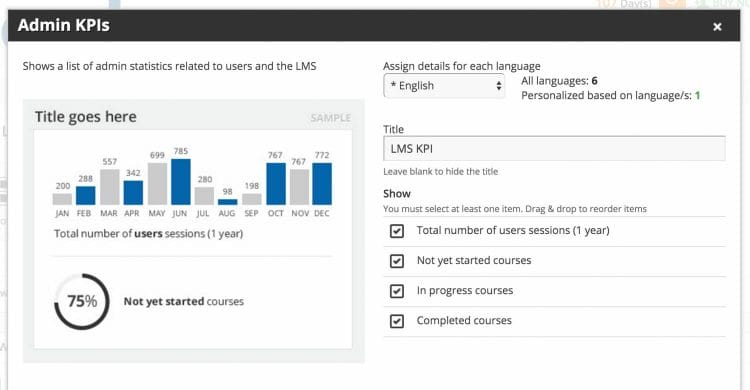
This widget displays a list of admin statistics related to users and the platform. We suggest including this widget in dashboards that are only visible to Superadmins. Insert the title of the widget, then select which KPIs you want to include in the widget. You can also change the order of the items by pressing the cross icon to drag and drop the elements. Press Confirm to create the widget.
HTML/WYSIWYG Widget
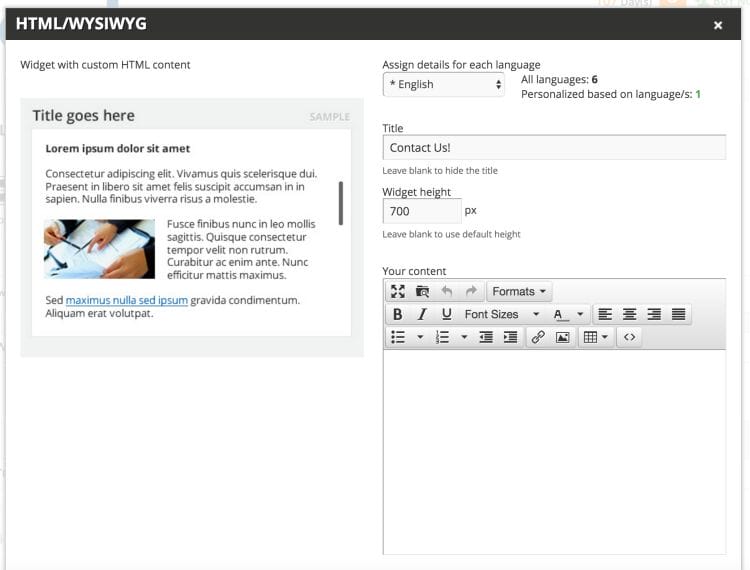
This widget allows you to create custom HTML content. Insert the title of the widget and its height. If you don’t insert a value in the widget height box, the system will use the default height for this kind of widget. Use the text editor to add text and pictures, or to embed videos from YouTube or Vimeo. Press Confirm to create the widget.
Catalog Widget
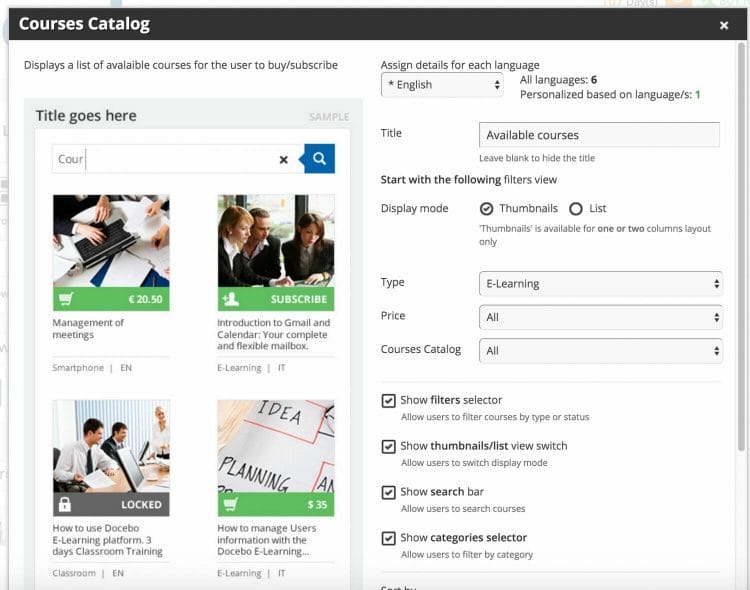
This widget displays a list of available courses for the user to buy or subscribe. Insert the title of the widget. Similar to the Courses widget, you can choose if you want to show the courses as a list or as thumbnails. Please remember that the thumbnail view is only available if you insert this widget in a one-column or two-column layout. Then, choose the course type that you want to display: E-Learning, Classroom, Webinar, Learning Plan.
Then, choose if you want your users to see the Filter selector, which allows users to display only the active courses, the completed courses, or all courses. You can also choose if you want them to see the search bar and the switch button, which allows users to change the courses’ view modality. Then, you can select how to sort the courses. Choose between the following: course name, creation date, enrollment status, or code.
Finally, define in how many courses you want to show the catalog widget, or select all of the catalogs. Users can access the full list by clicking on the View all courses link. You can also decide if you want to paginate the dashboard or show the link View all courses. Select the Confirm button to complete the operation.
Please Note: Superadmins cannot set the number of items to display if there is more than one catalog assigned to a user. If you include a catalog within the widget and a user is not assigned to said catalog, the user will instead see the catalogs to which he or she is assigned.
Power User KPIs Widget
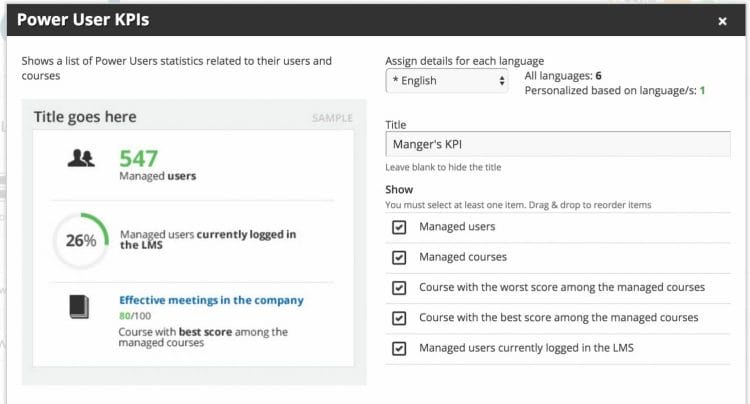
This widget displays a list of Power User statistics related to their users and courses. We suggest including this widget only in dashboards assigned to power users. Insert the title of the widget and its height. If you do not insert a value in the widget height box, the system will use the default height for this kind of widget. Flag which KPIs you want to include in the widget. Press Confirm to create the widget.
My Learning Plan Widget
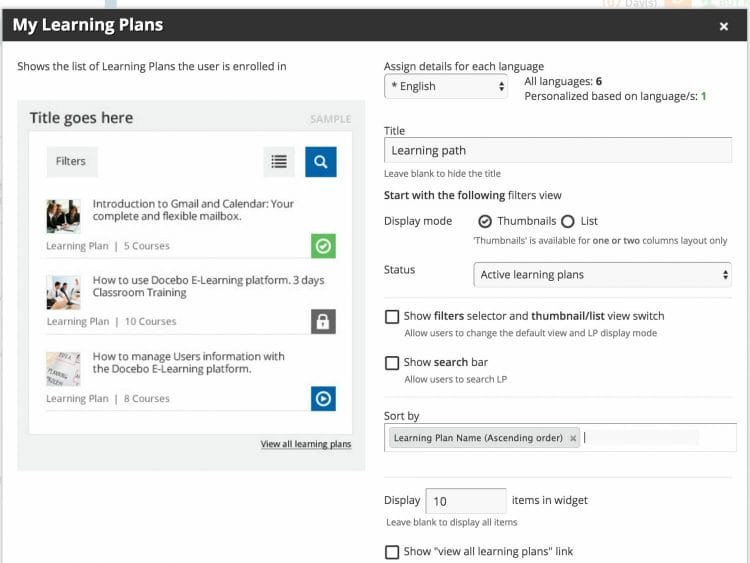
This widget displays the list of learning plans in which the user is enrolled. Each user will view only their own learning llans. Insert the title of the widget and its height. If you do not insert a value in the widget height box, the system will use the default height for this kind of widget.
Similar to the Courses widget, you can choose if you want to show the learning plan as a list or as thumbnails. Please remember that the thumbnail view is only available if you insert this widget in a one-column or two-column layout. You can choose if you want your users to see the categories filter and the search bar. You can also choose if you want users to see the switch button, which allows them to change the course view modality. You can also allow users to filter learning plans by status.
Subscription Codes Widget
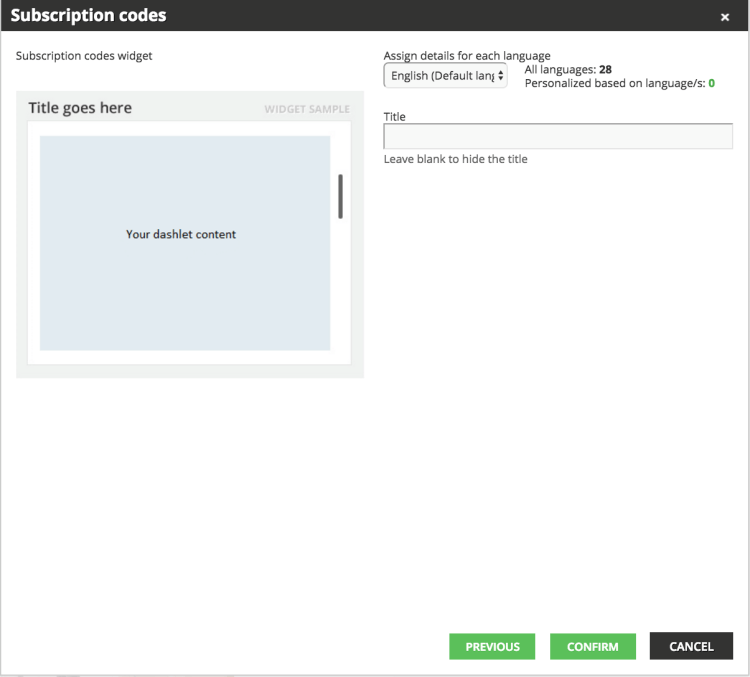
This widget is for those using Docebo’s Subscription Code app. This widget makes subscription codes easily accessible for users. Simply insert the title of the widget, the press Confirm.
Gamification Widget
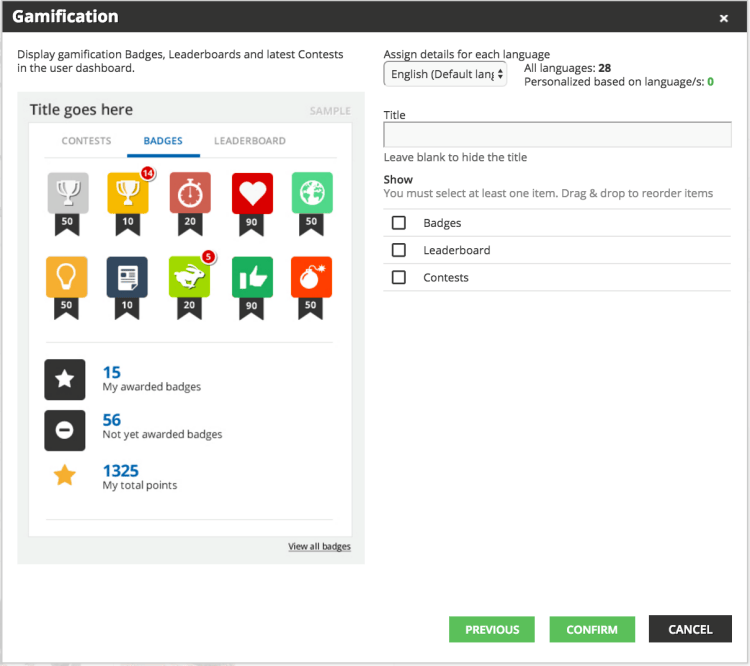
This widget is only available if you are using Docebo’s Gamification App. Here, you display user badges, contests, and the leaderboard. Begin by giving the widget a title, then flag what information you want to display in the widget. When finished, press Confirm.
Rewards Marketplace Widget
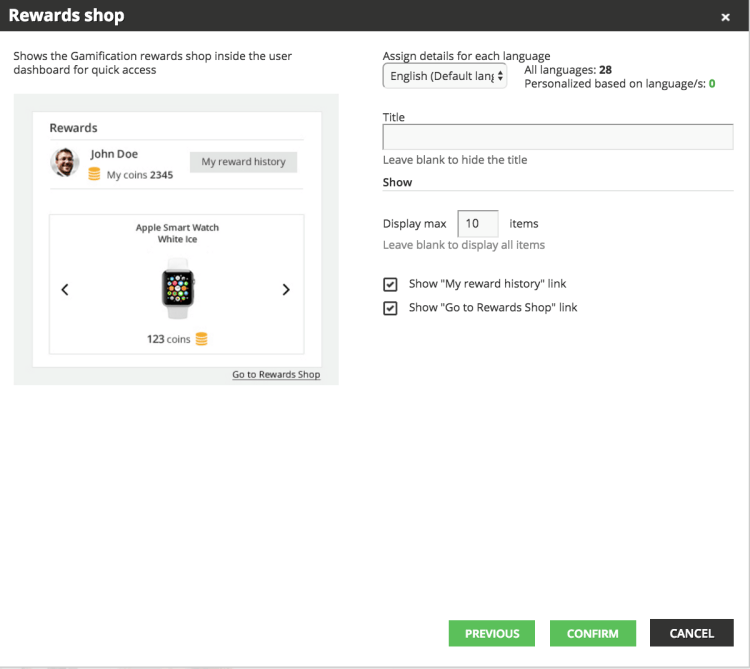
This widget is available for those that have enabled the Rewards Marketplace for the Gamification App. Start by adding a title to the widget, then choose how many items you want to display in the corresponding text box. Finally, flag whether you want to show links for the user’s rewards history and a link to go to the Rewards Shop. Press Confirm when you’re finished.
Channels List Widget
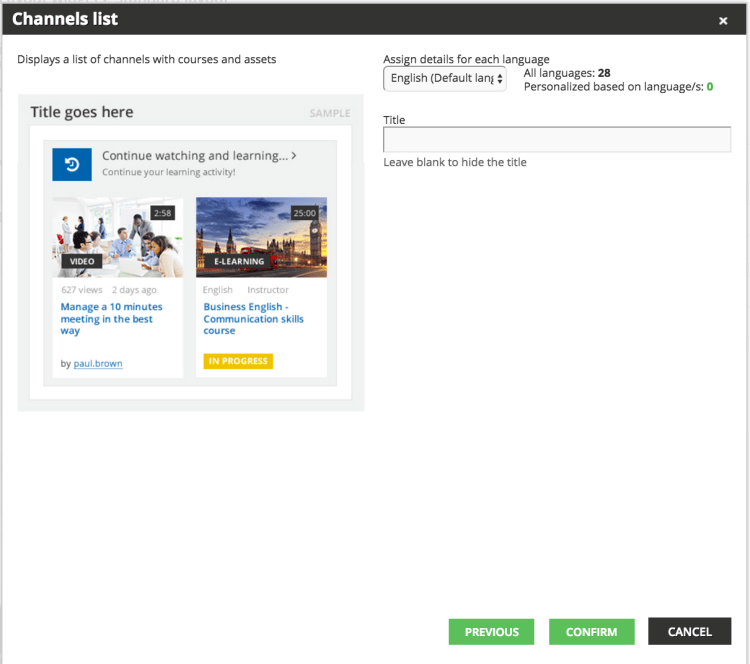
This widget displays a list of channels and assets within the channels for those using Docebo’s Coach and Share Module. For this widget, you just need to add a title as desired, then press Confirm.
Single Channel Widget
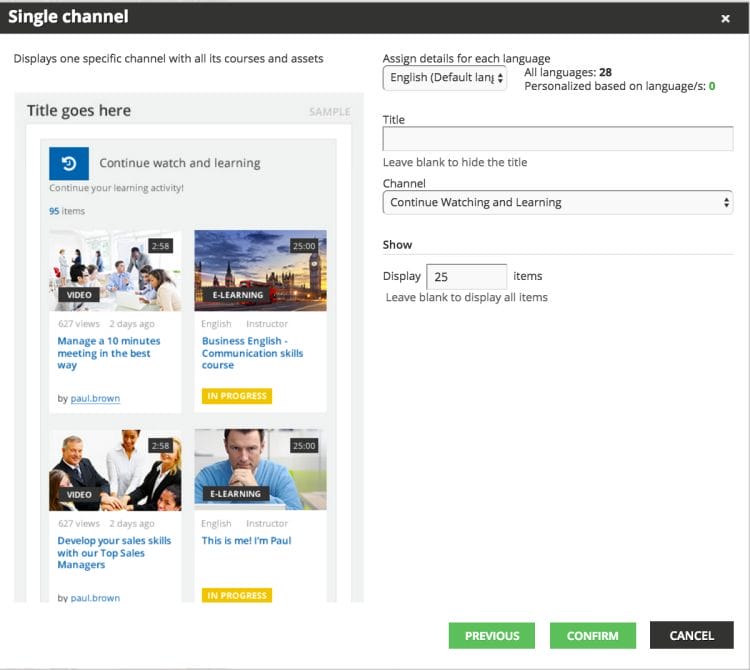
This widget displays a single channel with assets for those using Docebo’s Coach and Share Module. Add a title to the widget, then select which channel you would like to display from the corresponding drop down menu. Finally, decide how many items you want to display and type the number into the text box. When you’re finished, press Confirm.
External Training Widget
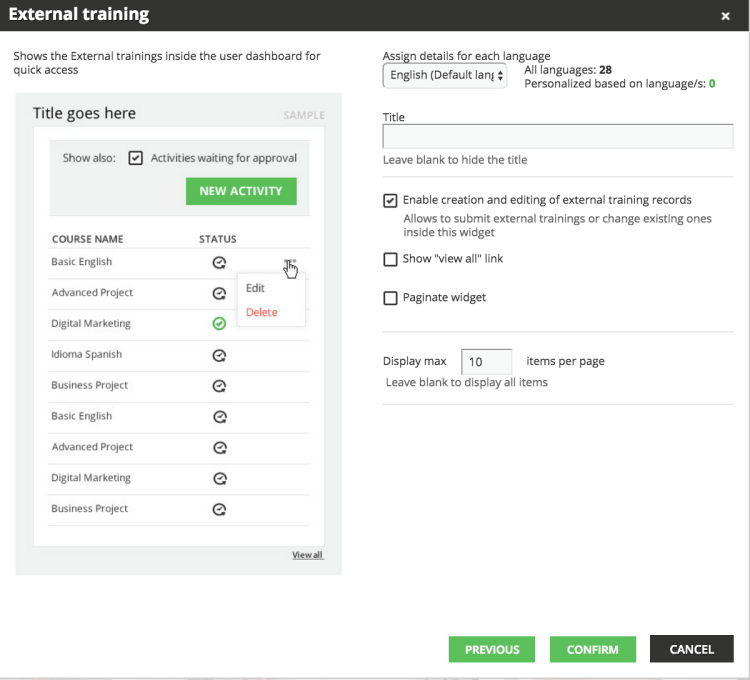
This widget provides quick access for users to Docebo’s External Training App, allowing them to view and manage their external training activity. Begin by giving the widget a title. Then, flag the various options to enable them inside the widget. You can allow the creation and editing of external training records. This allows users to submit external trainings or change existing ones inside this widget. You can also flag whether to show the View All item or paginate the widget. Finally, use the corresponding text box to decide the maximum number of items displayed inside the widget. When finished, press Confirm.

