DISCLAIMER: This functionality only works on those using Docebo’s 6.9 theme, which has a set End of Life date of July 31, 2019. The new Docebo Pages features lets you build custom pages and menus for various user groups in your platform, no coding skills required. You should start creating your pages & menus as soon as possible to avoid any disruptions in your platform for your users.
Introduction
In the LMS, Superadmins can configure which items appear in a user’s main menu, thus determining which areas of the platform are easily accessible via the main menu.
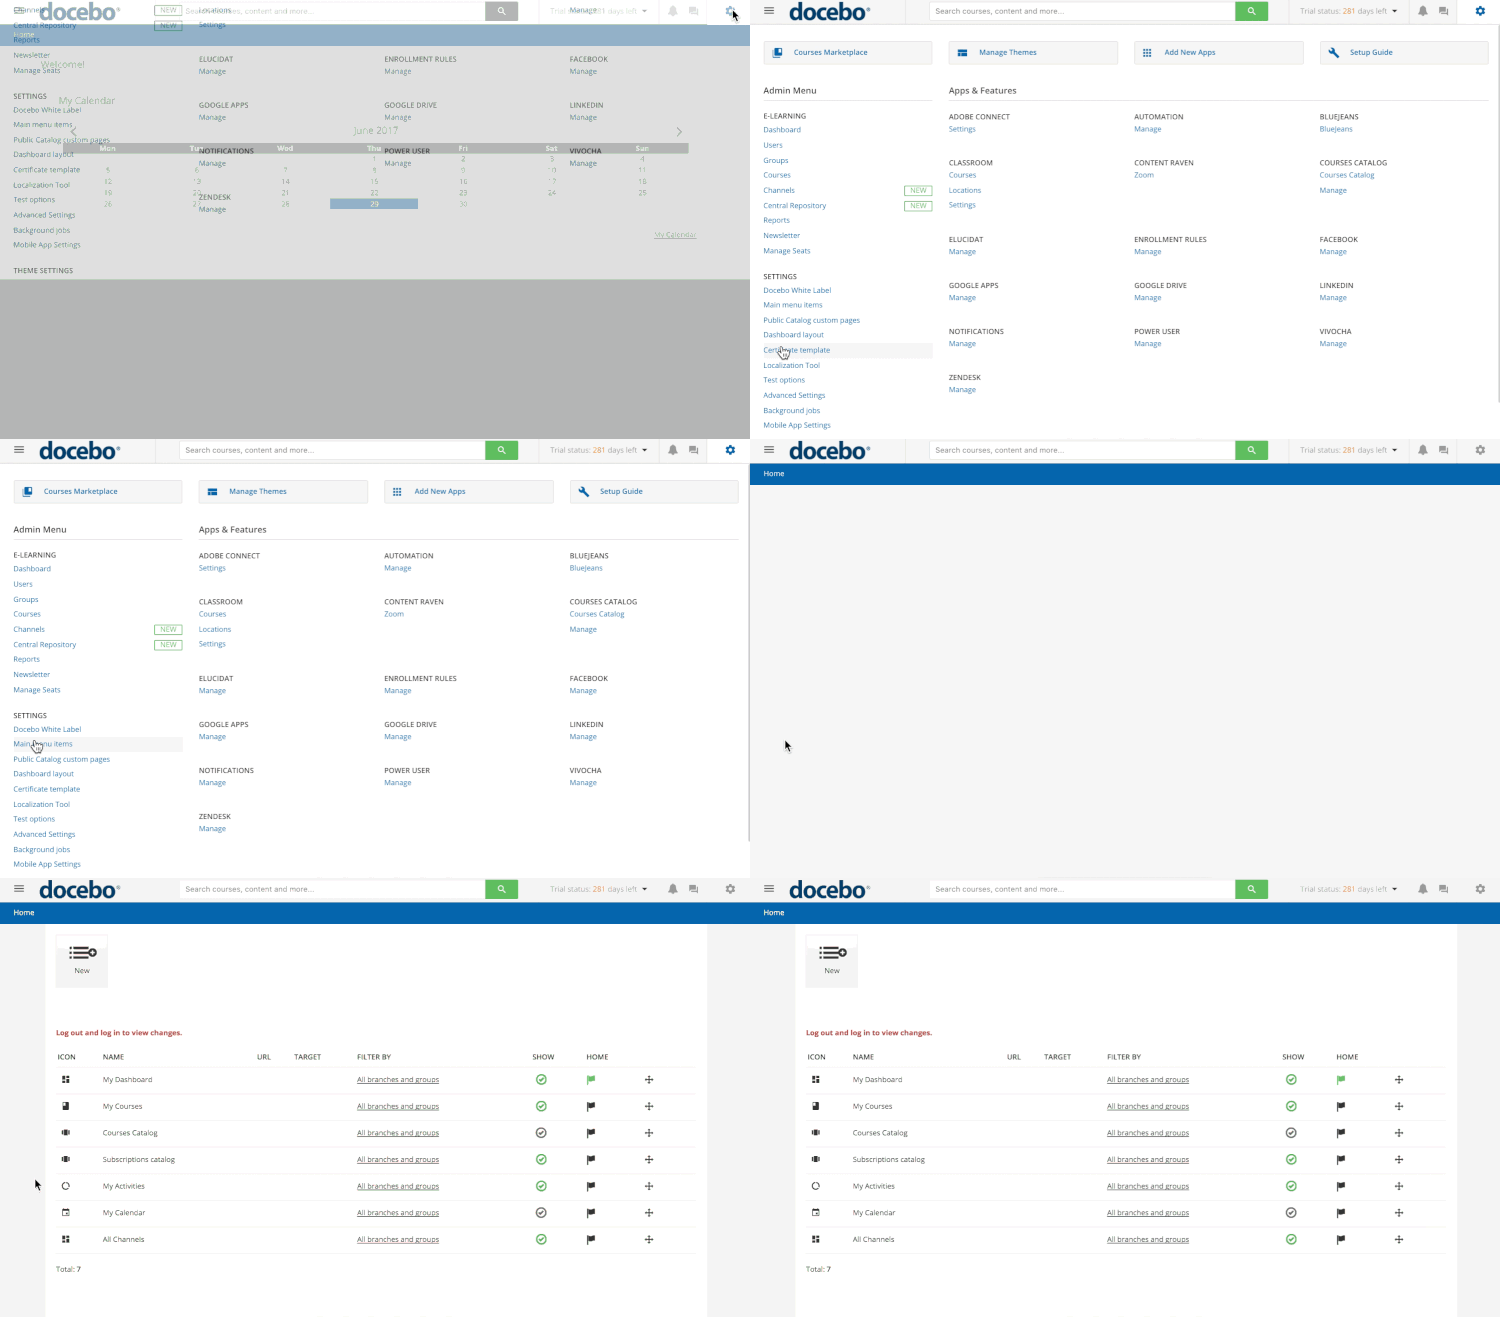
To configure this functionality, login to your platform as the Superadmin, then access the Admin Menu from the gear icon in the top right corner of the platform. In the Admin Menu, select the Main Menu Items subitem in the Settings section.
On this page, you can create brand new main menu items for users, or you can configure the pre-made items in the list.
Creating New Main Menu Items
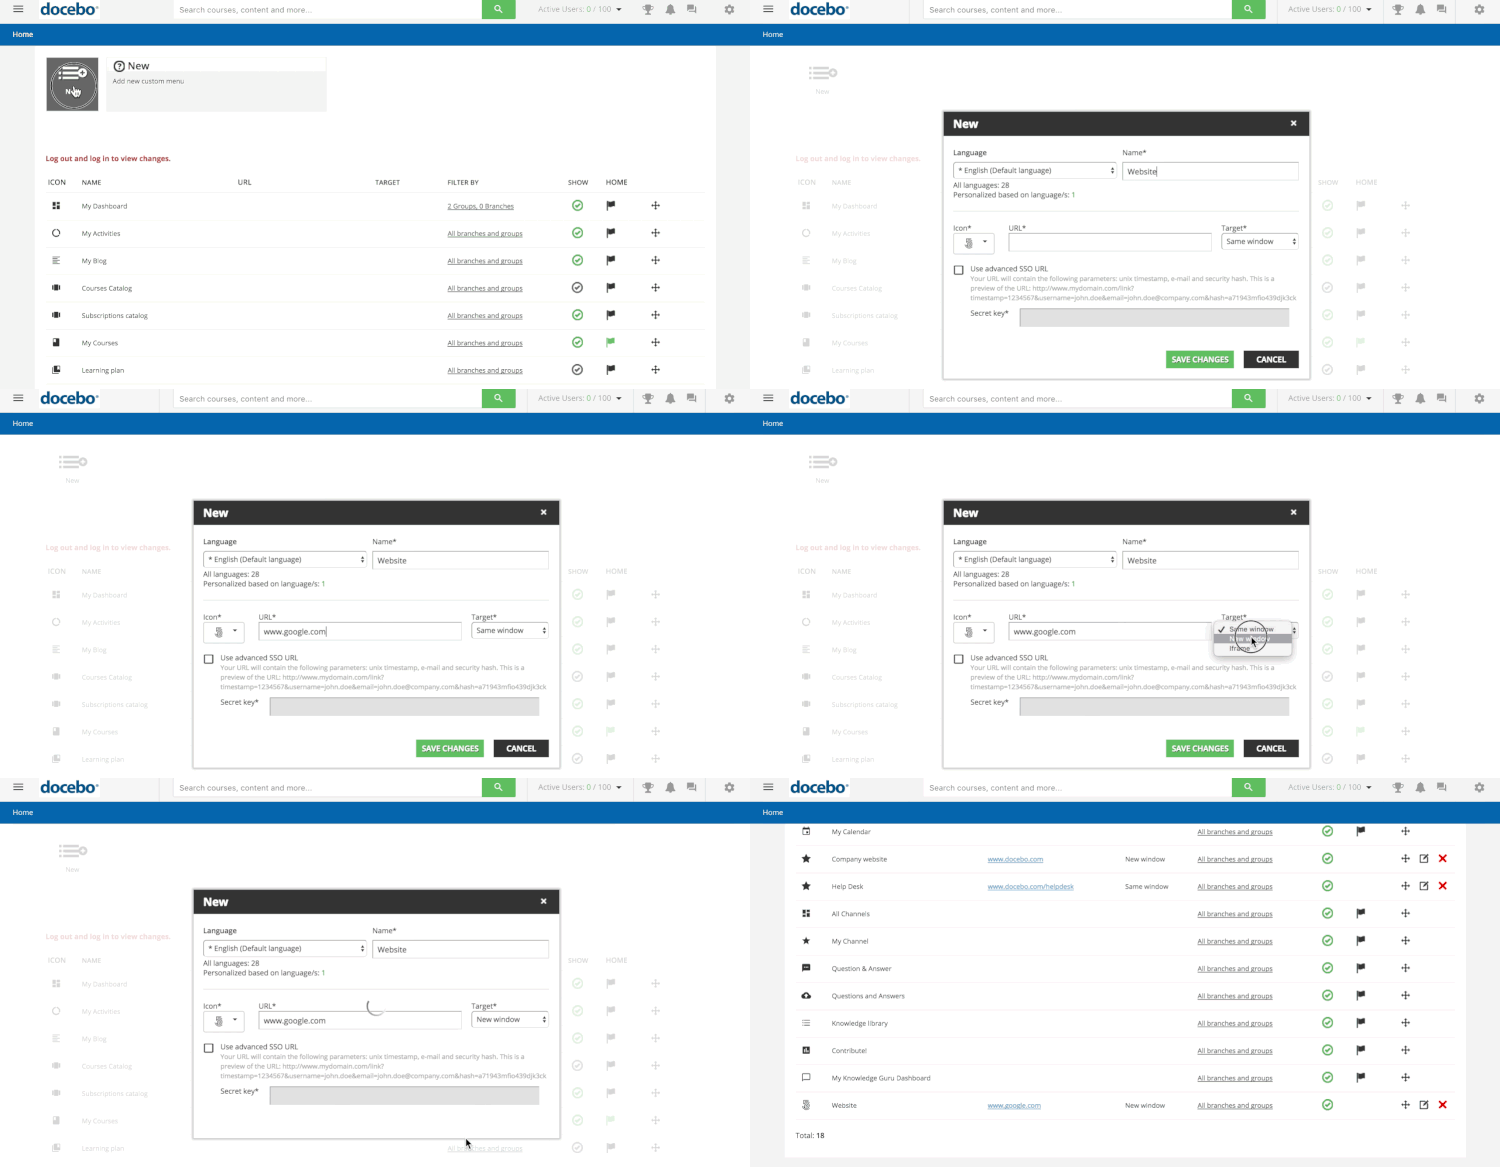
To create a new menu item, press the New button at the top of the page. In the pop up box, use the Language dropdown menu to assign a default language to the item, then give a name to the item.
Then, choose an icon. You can select one using the arrow to flip between pages, or search for one. The icon appears next to the name of the item in the main menu. Next, add the landing URL into the corresponding text box. This will be the URL that the users reach when they press the item in the main menu.
Using the Target dropdown menu, select whether the users will land in the same window, new window, or iframe when they press the main menu item. If desired, you can flag the option to use an advanced SSO URL. If you flag this option, you then need to add the secret key in the corresponding text box. When finished, press Save Changes.
Your new menu item will appear in the list of other items below. Refer to the next section to learn how to manage and configure existing main menu items.
Managing Main Menu Items
All main menu items will appear in the list on the Main Menu Items page (Admin Menu, Main Menu Items subitem in the Settings section). The order of the items in the list is the same order of the items that appear in the users’ main menus. To change the order of the items, use the cross icon to drag and drop the items throughout the list.
The checkmark icon in an item’s row determines whether the item is displayed in the main menu. A green checkmark confirms that the item is activated, meaning that it appears in the main menu. A grey check mark confirms that the item is deactivated, meaning that it will not appear in the main menu. Press the checkmark icon to switch it to green or grey, depending on your preferences.
In the Home column, change the flag from grey to green to set that item as the homepage of the LMS for users. Thus, when a user logs into the platform, he or she will land on this page. Please note that you cannot set multiple homepages. Only one item can be flagged as the homepage.
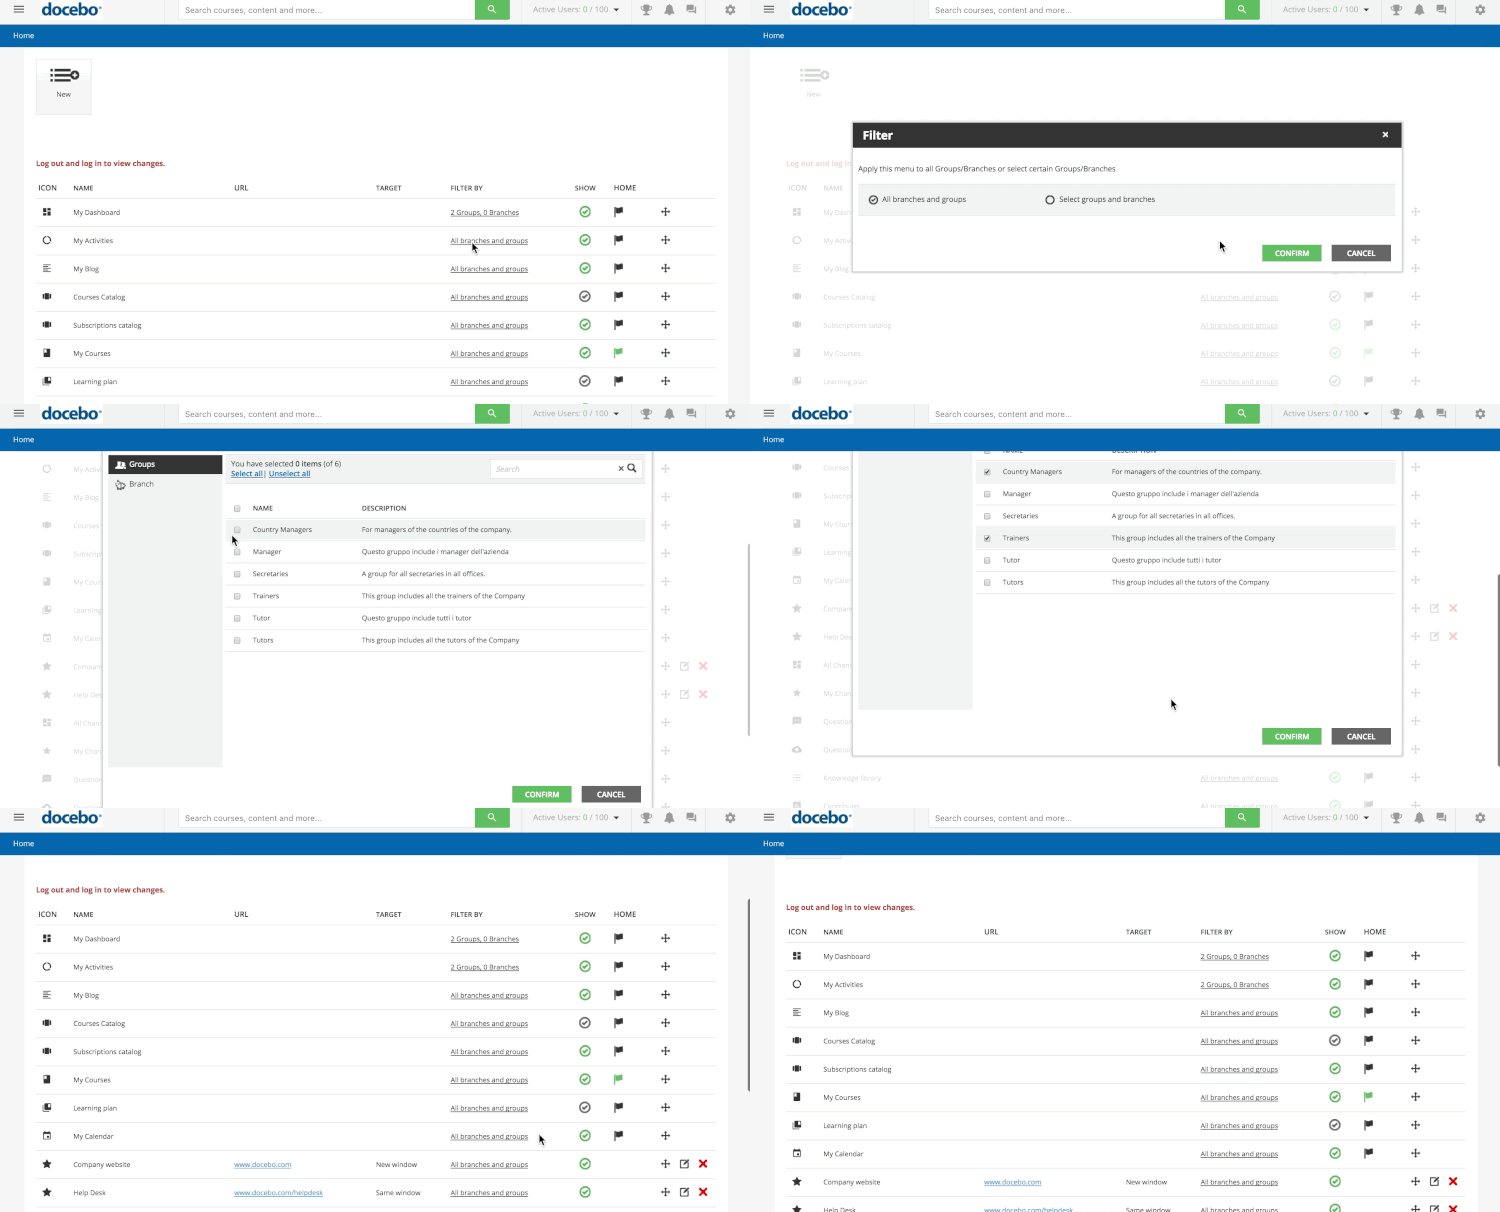
In the Filter By column, press the item to determine which groups and branches in the platform can view this main menu item. By default, all pre-existing and newly created menu items are assigned to all groups and branches. To change this setting, press the item in the Filter By column.
In the pop up box, flag the Select Groups and Branches item to set custom visibility for the menu item. Then, switch between the Groups tab and the Branches tab, flagging the groups and branches in the lists to which this item will be visible. When finished, press Confirm.
Please note that you need to logout of the platform and log back into the LMS to see any changes.
List of Pre-Made Main Menu Items
By default, your LMS has pre-made main menu items in the list:
- Subscriptions Catalog. This item directs users to a page of subscription catalogs to which they have been granted visibility. Please note that this item is only available if the Subscriptions module is active in your platform.
- My Dashboard. This item directs users to the main dashboard of their platforms. To learn about creating customized dashboards and assigning them to users, refer to this article.
- Learning Plan. This item directs users to a page displaying the learning plans to which they are assigned.
- My Courses. This item directs users to a page displaying all of the courses in which the users are enrolled.
- My Activities. This item directs users to a page with various graphs, information, to-do lists, and activity reports related to their learning experience. Learn more here.
- My Calendar. This item directs users to a calendar displaying their upcoming learning activities.
- All Channels. This item directs users to a page displaying all the channels to which the user has been grated visibility.
- Questions & Answers. This item directs users to the Questions & Answers area of the platform. Please note that this item is only available if Coach & Share is active in your platform.
- Contribute. This item directs users to a page where they can upload informal learning content. Please note that this item is only available if Coach & Share is active in your platform.
- My Channel. This item directs users to their personal channels in the platform. Please note that this item is only available if Coach & Share is active in your platform.
- My Expert Tasks. This item directs Coach & Share experts to a page displaying all of the tasks assigned to them. Please note that this item is only available if Coach & Share is active in your platform.
- My Coaching Activity. This item directs Coach & Share experts to a page displaying reports and information about any coaching activity completed by them. Please note that this item is only available if Coach & Share is active in your platform.
- Ask the Expert. This item directs users to an area where they can submit questions directly to Coach & Share experts. Please note that this item is only available if Coach & Share is active in your platform.


